
THIS VINTAGE JUNGLE POST first appeared in 2015. Because it was popular with visitors, I am sharing it again. I have made some revisions to the original post to account for changes to the game, but there will most likely be some inconsistencies with what’s presented here and the current rules.
PROPER DEPLOYMENT is at least as important to winning as having a good army list is. Though I am by no means a master tactician, I will share with you what I’ve learned by trial and error (mostly error).
The lessons in this series won’t get fancy or complex: this is basic information that new players or dumbasses like me need to know and remember so as to better their chances at victory. This series was initially written for 40K, but is relevant, methinks, to similar games, such as Grimdark Future. You can find the introduction here.
Even though I no longer play 40K, I am aware that 10th Edition 40K has done away with the Force Organization Charts that it used in previous editions. The FOC charts divided units into certain categories–HQ; Troops; Elites; Fast Attack; and Heavy Support–and even though those designations no longer exist, it’s still helpful to use them for deployment. Think of them as functions for the various units.
Back in the 3rd and 4th Editions of Warhammer 40K, Heavy Support units were almost always required to be deployed first, so we’ll start this series by discussing them. And even though you are no longer forced to deploy Heavy Support first, it’s not a bad practice, as often, they are the lynchpin of one’s army.
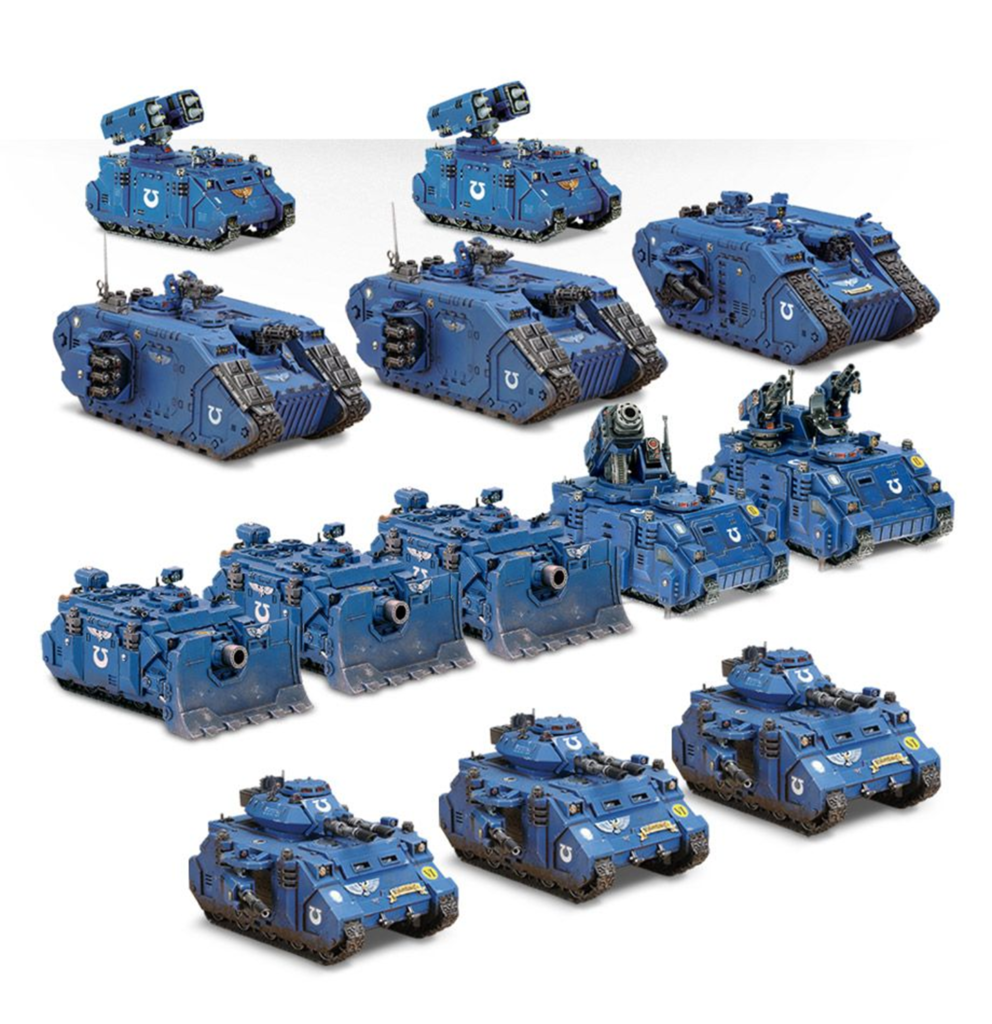
In this post, we’ll discuss “shooty” Heavy Support units. For the benefit of new players, Heavy Support units almost always come in one of two varieties: “shooty” or “non-shooty.”
A “shooty” Heavy Support unit is one that usually wields long-range and/or high-Strength weaponry to knock out enemy units from a distance. For the most part (though there may be exceptions), they use one of these keywords: <INFANTRY> <VEHICLE> <MONSTER>
<INFANTRY> These units are often soldiers on foot, such as squads of Space Marine Devastators, Chaos Space Marine Havocs, Eldar Dark Reapers, T’au Broadside Suits, Ork Flash Gitz, etc.

<VEHICLE> Alternatively, these units can be tanks or other mechs: Space Marine Predators, Whirlwinds, Land Raiders and Vindicators; Chaos Daemon Soul Grinders; Tau Hammerheads; Astra Militarum Leman Russ tanks (and variants), as well as Griffons, Manticores, Basilisks, etc.; Dark Eldar Ravagers; Necron Doom Scythes and Monoliths, and so on.

<MONSTER> Certain armies (Tyranids being the prime example) field one or more large beasts to spit/launch fire downfield. Examples include the Exocrine, the Tyrannofex, and the Biovore.
Most shooty Heavy Support units tend to be either small squads of 3-10 <INFANTRY>, or a single <VEHICLE> or <MONSTER>. Because these units tend to use lots of heavy weapons, they usually move only a little, if at all. Thus, when you are deploying them, you want to place them where they will spend most, if not all, of the game.
To Reserve, or Not to Reserve?
Usually, you’ll want to have your shooty Heavy Support units on the table at the beginning of the game, so that they can hopefully fire each turn, of which you only get 5-7 in a standard mission. So, unless the mission makes you keep Heavy Support units off the board, you probably don’t want to put them in Reserve.
You may want consider making an exception to deep-strike your Heavy Support unit onto the board. And why would you want to do that?
- To compensate for short-range weaponry. Certain HS units (such as the Necron Monolith) don’t have guns with a lot of reach, so bringing them on later, within their range, makes sense.
- To get at opponent’s prime units. Many players like to keep expensive and / or heavy-hitting shooty units way back in their deployment zones, out of reach of most of your weaponry. In that case, you could send in a HS unit (such as Space Marine Devastators with multi-meltas in a Drop Pod) to take them out.
- To befuddle your opponent with an unexpected tactic. When swarms of T’au Sniper Drones show up and outflank the advancing enemy, that can severely throw a wrench into their schemes. Does the enemy stop their advance to turn and deal with them? Does the enemy redirect their heavy weapon fire? Do they ignore them? Etc.
But those are special cases. Almost always, you’ll want to start your shooty Heavy Support on the board.
How to Deploy Shooty Heavy Support Units
Let’s get down to details. When placing these units, follow the guidelines below:
Place them first, before other units. As I mentioned earlier, these units are often integral to your battle plan, so make sure they get the prime real estate in your deployment zone.
Place them where they have line of sight. You need to be able to see a target if you want to kill it. Unless you’re playing with no terrain, there will be some spots that your guns can’t get to, but minimize that number by putting your units where they can see most of the board. An easy example of this is putting infantry units up high, atop hills and buildings, so that they can shoot over intervening units and terrain.
I usually prefer to put my HS units in the center of my deployment zone, but sometimes, the board will have a lot of terrain in the middle that blocks line of sight. One workaround is to put Heavy Support units off center, or even in corners, so as to be able to shoot past the terrain. This almost always cuts down on how much firepower you can throw at certain targets, but having a few shots is better than none at all.
Place them where they have range. Most shooty HS units have plenty of range anyway, because of their weapons, and/or (especially if they are vehicles) can move fairly swiftly to get in. You want your unit’s guns to have range to most of the board, if not the whole thing.
A few heavy weapons have a relatively short range, which you’ll want to bear in mind. In that case, you’ll want to put them closer up in your deployment zone so that they can start targeting the enemy in Turn 1 or (at the latest) Turn 2.
If your opponent is playing an army (Orks) that you know will advance towards yours, it’s not crucial that your Heavy Support units be in range at the start of the game, particularly if he has the first turn and his army will have moved into range when you start yours. But it’s still better to be in range from the get-go.
Place them in cover, if you can. Heavy Support units draw quite a bit of enemy attention, so if you are able to, find them some cover. However, it’s more important that your Big Guns have line of sight and range: they’re usually fairly expensive, so they need to be able to do stuff.
Place them towards the middle or rear of your deployment zone, if you can. Unless a unit has issues with range, there’s usually little need to place them up front, where they’re in range of enemy heavy- or special weapons, or can be more easily reached by assault forces. But make sure that they still have line of sight (most important) and range (second-most important).
Leave room for other units. On the off chance that you have lots of Heavy Support models (such as, for example, squadrons of Leman Russ tanks) or that they’re very big (Monoliths), make sure you leave space for other units that can back up your Heavy Support units.
Conclusion
So there you have it: the first—but certainly not the last!—installment of Deployment for Dumbasses (Like Me). I hope it’s been valuable, and that you’ve learned something: at the very least, you should know what NOT to do. Next time out, we’ll discuss non-shooty “Heavy Support” units.
Kenton Kilgore writes killer SF/F for young adults and adults who are still young. His most popular novels are Lost Dogs and Stray Cats, and now you can get them both for one low price in this Kindle box set, available only on Amazon for $4.99!

In Lost Dogs, when our world ends, their struggle begins! After inhuman forces strike without warning or mercy against mankind, Buddy, a German Shepherd, must band with other dogs to find food, water, and shelter in a world suddenly without their owners. But survival is not enough for Buddy, who holds out hope that he can find his human family again.
In Stray Cats, cats really do have nine lives–but they live them all at once, on different worlds. This follow-up to Lost Dogs features the adventures of Pimmi across the multiverse as she faces off against a cosmic menace threatening her and everyone she loves. But against such power, how can one small cat–even with nine lives–prevail?
Included in the boxed set are:
- An alternate ending for Lost Dogs;
- Lost Dogs original (2014) cover art;
- Excerpt from Kenton’s next fantasy novel, The Scorpion & The Wolf (coming 2024);
- Artwork from The Scorpion & The Wolf, by Alyssa Scalia
Dog lovers love Lost Dogs, and fans of felines adore Stray Cats. At last, you can have them both at one low price–get them now!